How to install 3Shape Unite
Dental Desktop-Unite is a software on which the user might install different 3Shape Apps (based on the licenses on the dongle subscription and the country in which the system is located).
How to select the type of Unite installation
It's important to install Unite in a way which is the most convenient for the user and would be based on his setup in the office.
Refer to the relevant article to learn more about them.
How to perform the installation
- Where to get installer:
- For new installation - in the box on the flash drive.
- For new installation - on Partner Portal in the relevant section.
- For existing installation - you can take it from ProgramData folder in the following path: C:\ProgramData\3Shape\DentalDesktop\ServerPackages.
- It's recommended to run DentalDesktop installer as administrator to let the software have necessary permissions during the installation process. For that, please right click on the installer and select "Run as administrator."
- Select the correct type of installation following the article: Select the type of installation.
If customized data location selected, you would need to press Next few more times. - Confirm Destination folder (desired installation folder location you want to use for Dental Dekstop filestorage and folders) and press Install:
- Wait until the software installs all the required data and once it's done press "Finish":
- Unite will be launched, please select 'Default user' for login.
NOTE: For Client setup you need to select the Server to which you will be connecting by right-clicking on Server name -> Add server ->then type the PC name (Trios server PC that always has the dongle connected) or type the IP address of Server PC and press OK: - On first Dental Desktop login you will see Setup Wizard:
- Select the country in which the user is located and language: NOTE: Depending on the country you will receive software upgrades and relevant Apps versions, so it's required to select the actual country where the customer is located.
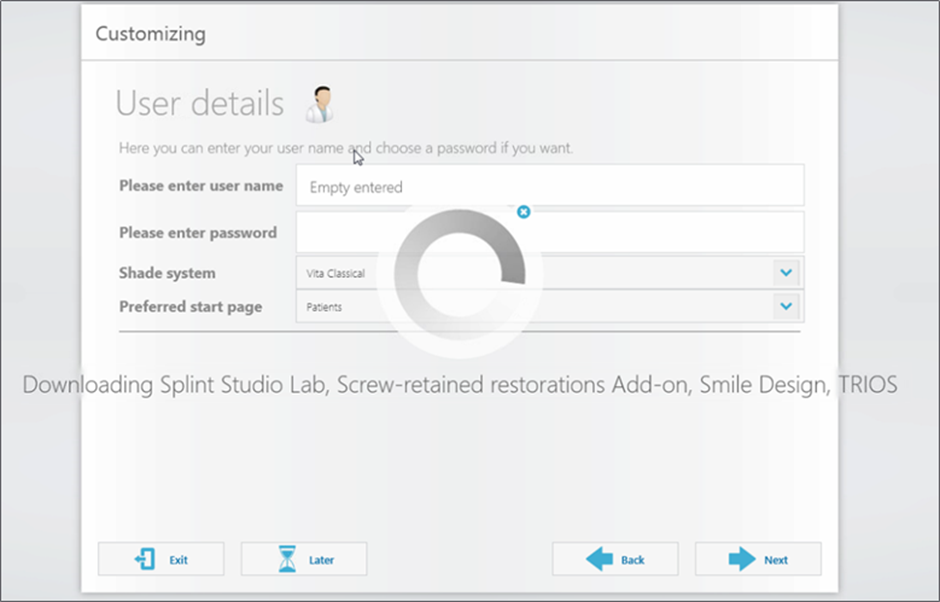
- Configure User details (can be skipped by pressing "Later" and done in the software afterwards).
- Once setup is finished -> Unite will check which Applications and software version you may install as shown below:

- Once download and installation of Applications is finished, Unite would restart and the user may work with the software.
In case of any problems during Unite installation, please refer to the following articles:
- Apps don't show up in Dental Desktop
- Startup errors
- Dongle issues
In case of any issues with installation and the above articles do not help, please contact 3Shape Support.
Unite 3 Installation Guide – New Installations
If you plan to install Unite 3, please consider the following scenarios before proceeding with the installation.
Scenario 1: Existing Customer with Unite 3 Installed on Another System
This scenario applies when the customer already has Unite 3 installed on one or more computers and needs to install it on a new workstation.
✅ Pre-Installation Checklist
Before starting the installation, ensure the following points are validated:
Installed Version
- Verify the version of Unite 3 currently installed on the existing systems.
- It is critical to install the same version on the new computer to ensure compatibility.
Hardware Requirements
- Confirm that the new computer meets the minimum system requirements.
- This can be validated by reviewing the latest PC Catalog available on the Partner Portal. PC
Network Requirements
- Ensure the network meets the minimum requirements.
- Refer to the corresponding network requirements article for validation. 3Shape Unite (Dental Desktop) Network requirements and Connections - 3Shape
Ports and Firewall
- Verify that all required ports are open.
- Ensure that firewall settings are not blocking communication between systems. 3Shape Unite (Dental Desktop) Network requirements and Connections - 3Shape
Storage Requirements
- The installation drive must:
- Be an SSD
- Have sufficient free disk space
How to Obtain the Installer
You can obtain the Unite 3 installer using one of the following methods:
Option 1: From an Existing System
- Navigate to:
C:\ProgramData\3Shape\DentalDesktop\ServerPackages - Copy the installer files.
- Transfer them to the new computer.
Option 2: From a Shared Location / Repository
- Navigate to:
X:\Dental Desktop\Products\Dental Desktop - Locate the version currently used by the customer.
- Copy the installer to the new machine.
Installation Process
- Run the installer as Administrator.
- Follow the installation wizard instructions.
Sign-In and System Detection
After the installation is complete:
- Select "Get Started".
- The system will automatically detect other Unite 3 systems available on the network.
- You will only need to:
- Enter the password
- Set up your PIN code

Data Synchronization
- Once signed in:
- The system will automatically begin synchronizing data.
- All available information from the other connected systems will be loaded.
✅ Expected Outcome
After completing the process:
- The new workstation will be fully integrated into the existing Unite 3 environment.
- It will have access to all shared data across the network.
Scenario 2: New Customer – Fresh Installation (From Scratch)
This scenario applies when the customer does not have any previous Unite 3 installations, and there are no existing systems associated with a 3Shape account.
✅ Initial Considerations
Before starting, keep the following in mind:
- There are no existing Unite 3 installations
- No computers are currently linked to a 3Shape account
- A new company account must be created
Create a 3Shape Company Account
- A new 3Shape account must be created before proceeding.
- Please follow the corresponding article that explains how to correctly create a company account. How to create a 3Shape Account - 3Shape
Identify the Company GUID
- Once the company has been created:
- Retrieve the Company GUID
- This GUID is essential for determining the correct software version.
Validate the Required Version in CAT
- Using the Company GUID, verify in CAT (Configuration Application Tool):
- Which Unite 3 version must be installed for that specific customer.
✅ Pre-Installation Requirements
Before proceeding with installation, validate the following:
1. Hardware Requirements
- Ensure the PC meets the minimum specifications.
- Refer to the latest PC Catalog available on the Partner Portal. PC
2. Network Requirements
- Confirm the network meets all minimum requirements.
- Refer to the official network requirements article. 3Shape Unite (Dental Desktop) Network requirements and Connections - 3Shape
3. Ports and Firewall
- Verify all required ports are open.
- Ensure firewall configurations are not blocking communication. 3Shape Unite (Dental Desktop) Network requirements and Connections - 3Shape
4. Storage Requirements
- The installation drive must:
- Be an SSD
- Have sufficient free disk space
Obtain the Installer
- Navigate to the following path:
X:\Dental Desktop\Products\Dental Desktop - Locate the version identified in CAT.
- Copy the installer files.
- Transfer them to the customer’s computer.
Install Unite 3
- Run the installer as Administrator.
- Follow the installation wizard instructions until completion.
Sign In
- Once installation is complete, click "Get Started".
- Enter the account credentials created earlier.

Step 7: Activation and Module Download
- Ensure that the activation/verification code is properly applied. Cloud Activation code - 3Shape
- This step is required for the system to begin downloading the corresponding modules.
⚠️ Important:
- Refer back to the previously mentioned article to confirm:
- Where to locate the activation code
- How to apply it correctly